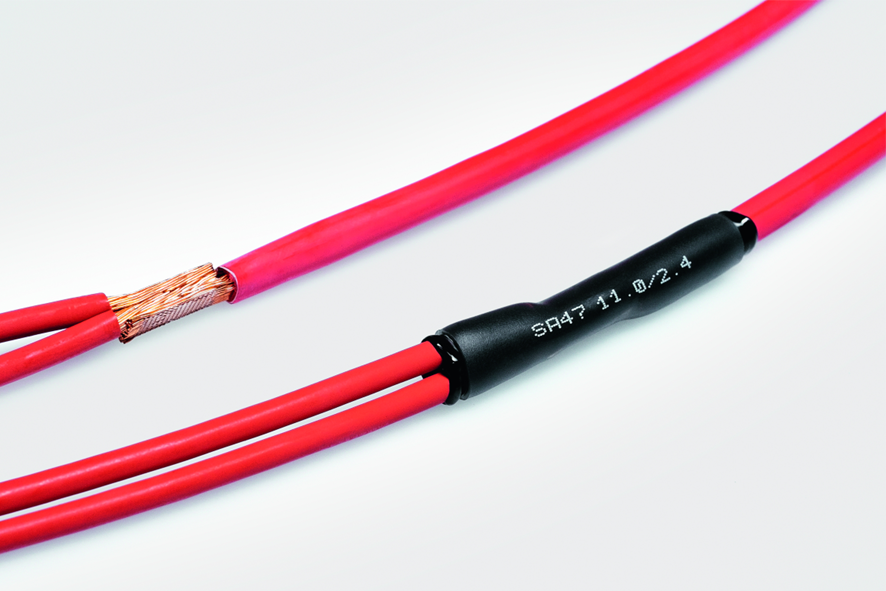
Heat shrink tubing is a versatile applicant that helps with insulating wires along with strain relief and colour coding cables. There are specific types of heat shrinks available by which you can even solder and waterproof your materials.
In this article, we will walk you through how to use the heat shrink tubing properly by picking the right size and material of the tubing for your project.
What Is Heat Shrink Tubing?
First things first, we need to understand what heat shrink tubing is, which is also known as heat shrink sleeving. As the name suggests, the heat shrink tube shrinks when exposed to heat. It is a tubing that is fitted around the components that require protection. It is available in various materials such as PVC, PTFE and Polyolefin amongst many others. Each material providing its own unique properties and features that will benefit the type of project you’re working on. The sleeving is shrinkable once exposed to heat and is used in several useful applications in electrical projects throughout a wide range of industries.
Regardless of the component size that it will be covering, the environmental demands or the required ratio for shrinkage, there is a heat shrink tube available for the purposes you need.
Why Is Heat Shrink Tube Used?
Heat shrink is versatile and can be used for many different purposes, from electrical insulation to strengthening of cables. The majority of the uses are related to wires and cables. The following are the most common out of the many applications:
· Electrical Insulation: One of the most common applications of heat shrinks is for insulating electrical wires, solder splices, terminals, and joints. Since heat shrinks are non-conductive, they form a protective layer from short circuits when applied to electrical cables.
· Strain Relief: Strain reliefs reduce mechanical stress on the cables. Fragile wires can break easily without applying strain reliefs. Therefore, adding a small heat shrink tube around the bending part of the wires is the easiest way to add strain relief to the cables.
· Bundling wires: If your project has a lot of cables, you might want to have them neatly organised. Hence, heat shrink is an excellent tool to bind loose wires, giving you a cleaner result than cable ties.
How To Apply Heat Shrink Tubing In A Proper Way?
The following tips will help you understand how to apply your heat shrink tube properly to your cables to get the best coverage.
Choose the right size.
The primary use of the heat shrink tubing is to secure and tightly fit around the cable. Therefore, make sure that the tubing size is smaller than the diameter of the object you are splicing or insulating after heat shrinking.
Do not pull or stretch the tubing.
If you do not choose the correct size of your heat shrink tubing, it may tear apart while you are applying heat to it. Therefore, avoid stretching or pulling the tubing over the object.
Factoring the length change.
You must remember to factor the shrink, especially in smaller objects, as your tubing will change its size during its recovery mode. The more the heat shrink tube is heated, the more the length change occurs.
Make sure you have the correct size.
It is recommended to use the specified ID dimension to determine the tubing's correct size. Heat shrinks are supplied at minimum expanded diameters, thus remaining consistent.
Not all heat shrink tubings are the same.
You must not forget that heat shrink tubings are available in different types and sizes. Therefore, they do not shrink to similar full-recovered dimensions when heated to shrink. Before heating, you should always check the measurements of the recovered internal diameter of the heat shrink.
Be careful with the sharp or jagged edges.
If you are working with materials with sharp or jagged edges, make sure that they do not cause a cut or a puncture in the tubing, which can result in cracking or splitting the tubing when heated.
Always verify the temperature guidelines.
Before you start with the heating process, ensure that you have verified the correct temperature of the heat gun, as you may encounter problems if the tubing is not heated at an appropriate temperature. If you expose it to too much heat, the tubing may burn or split. In contrast, if the heat is not enough for the tubing, it may not fully recover.
Remember to heat the tubing uniformly.
While heating the tubing with the heat gun, make sure that the heat is distributed uniformly among the heat shrink. If not, you might notice wrinkles, also known as chill marks.
Always adhere to the guidelines.
For recommended recovery of the heat shrink tubing, adhere to the guidelines that will assist you in the full recovery of the tubing while making it come to room temperature.
Quick FAQs
How much does heat shrink reduce in size after heating?
Depending on their shrink ratios, different types of tubings shrink to different sizes. For instance, tubing with a 5mm diameter would shrink to 2.5 mm, with a shrink ratio of 2:1, when properly heated. Most heat shrinks also reduce along with their length upon heating. This reduction in size is typically 5 to 15% of the total length of the tubing.
What happens if the heat shrink is cut?
Cutting heat shrink tubings into smaller pieces usually does not cause any problem. In fact, cutting heat shrinks according to your needs is an essential step in your project.
What is the correct temperature to heat shrink the tubing?
The appropriate temperature to heat shrink the tubings usually depends on the heat shrink's size and material type. However, the most suitable temperature to shrink the Polyolefin tubing is around 90°C, while the tubings made of PVC require a slightly higher temperature, which is approximately 100°C to 110°C.
Is there any alternative to using heat shrinks?
The most common and appropriate alternative to heat shrink is electrical tape. However, you can also use expandable sleeves or self-amalgamating tape for lower voltages projects.


